Executive Summary:
In today’s fast-paced software development environment, maintaining high code quality and security is vital. SonarQube is an industry-leading continuous inspection tool that enables teams to automatically detect coding issues and vulnerabilities early in the development cycle. This article details a step-by-step guide to installing and setting up SonarQube with PostgreSQL on Ubuntu 20.04 LTS, empowering your development teams to improve code quality through automated analysis.
Challenges:
As development teams grow, so does the complexity of codebases. Manual reviews become less effective at scaling code quality controls, and issues such as technical debt, code smells, security vulnerabilities, and inconsistent coding practices can go unnoticed until they cause significant setbacks. Teams also need tools that integrate seamlessly with their existing CI/CD pipelines and version control systems, such as GitHub.
Scenario:
Your company’s DevOps team is tasked with implementing a centralized code quality solution that integrates with your development workflows, particularly GitHub, and offers automated, detailed feedback on every code push. The goal is to set up a robust and scalable instance of SonarQube, making it easy for developers to analyze their projects and take action on identified issues.
Problem:
Without an effective system for continuous code analysis:
-
Teams lack visibility into code quality.
-
Security vulnerabilities can slip into production code.
-
It’s difficult to enforce coding standards and best practices.
-
Manual code reviews become a bottleneck.
Solution:
Setting up a dedicated SonarQube server using Docker or a regular instance provides an automated and user-friendly platform for code quality management. Connected with a PostgreSQL database, SonarQube will continuously analyze code, identify bugs, code smells, and security flaws, and report them via a web UI accessible to your development teams
Prerequisites:
Before starting the installation, ensure:
-
Operating System: Ubuntu 20.04 LTS (or compatible)
-
Access Level: Sudo privileges
-
Network Access: Ability to access GitHub and download packages
-
Java: OpenJDK 17 must be installed
-
System Resources: At least 2 vCPUs and 4GB RAM for SonarQube
-
Other: Internet connection, wget, unzip, and adequate disk spac
Implementation:
Below is a step-by-step breakdown for setting up SonarQube with PostgreSQL:
1. Update System Packages
sudo apt-get update
sudo apt-get upgrade -y
2. Install Java (OpenJDK 17)
sudo apt-get install openjdk-17-jdk -y
java -version
3. Install wget & unzip
sudo apt-get install wget unzip -y
4. Install & Configure PostgreSQL
Add PostgreSQL repository and install:
sudo sh -c ‘echo “deb http://apt.postgresql.org/pub/repos/apt/ $(lsb_release -cs)-pgdg main” >> /etc/apt/sources.list.d/pgdg.list’
wget -q https://www.postgresql.org/media/keys/ACCC4CF8.asc -O – | sudo apt-key add –
sudo apt-get install postgresql postgresql-contrib -y
Start & enable service:
sudo systemctl start postgresql
sudo systemctl enable postgresql
Create a SonarQube user and database:
sudo -u postgres createuser sonar
sudo -u postgres psql
ALTER USER sonar WITH ENCRYPTED PASSWORD ‘sonar@123’;
CREATE DATABASE sonarqube OWNER sonar;
GRANT ALL PRIVILEGES ON DATABASE sonarqube TO sonar;
\q
5. Download & Install SonarQube
cd /opt
sudo wget https://binaries.sonarsource.com/Distribution/sonarqube/sonarqube-9.9.0.65466.zip
sudo unzip sonarqube-9.9.0.65466.zip
sudo mv sonarqube-9.9.0.65466 sonarqube
6. Configure SonarQube
Create user and group, set permissions:
sudo groupadd sonar
sudo useradd -c “SonarQube user” -d /opt/sonarqube -g sonar sonar
sudo chown -R sonar:sonar /opt/sonarqube
Edit SonarQube config for database access:
# In /opt/sonarqube/conf/sonar.properties
sonar.jdbc.username=sonar
sonar.jdbc.password=sonar@123
sonar.jdbc.url=jdbc:postgresql://localhost:5432/sonarqube
Set RUN_AS_USER in sonar.sh:
RUN_AS_USER=sonar
7. Start SonarQube
sudo su sonar
cd /opt/sonarqube/bin/linux-x86-64/
./sonar.sh start
Check logs and status as needed.
8. Set Up as a Systemd Service
Create and edit /etc/systemd/system/sonar.service:
[Unit]
Description=SonarQube service
After=syslog.target network.target
[Service]
Type=forking
ExecStart=/opt/sonarqube/bin/linux-x86-64/sonar.sh start
ExecStop=/opt/sonarqube/bin/linux-x86-64/sonar.sh stop
User=sonar
Group=sonar
Restart=always
LimitNOFILE=65536
LimitNPROC=4096
[Install]
WantedBy=multi-user.target
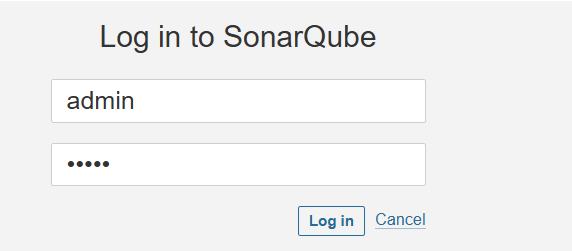
9. Access SonarQube Web UI
Navigate to http://<your-server-ip>:9000 in your browser.
Default credentials:
-
Username:
admin - Password:
admin
(Update the password at first login!)
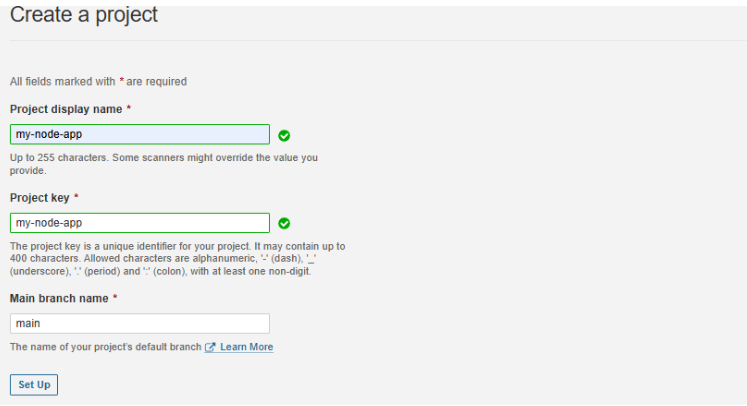
Integrating with GitHub
-
Create a new project in SonarQube.
-
Generate an authentication token via the UI.
-
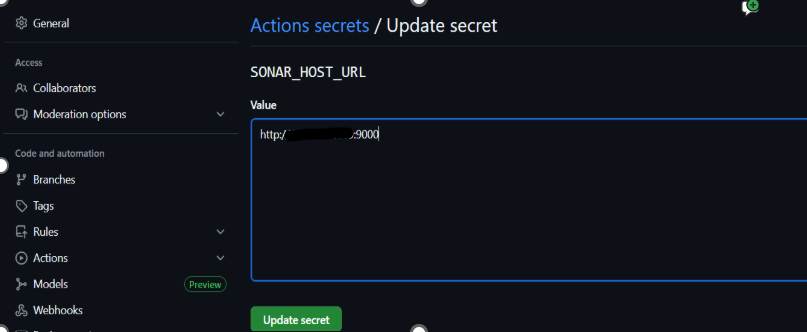
In your GitHub repository’s Settings > Secrets, add:
-
SONAR_TOKEN(your generated token) -
SONAR_HOST_URL(e.g.,http://<your-server-ip>:9000)
-
-
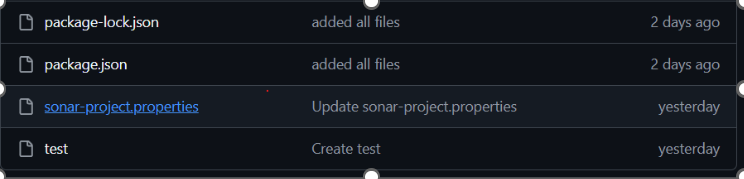
Add a
sonar-project.propertiesfile to your repository.
-
Add or update your GitHub Actions workflow (
.github/workflows/build.yml) to include SonarQube analysis.
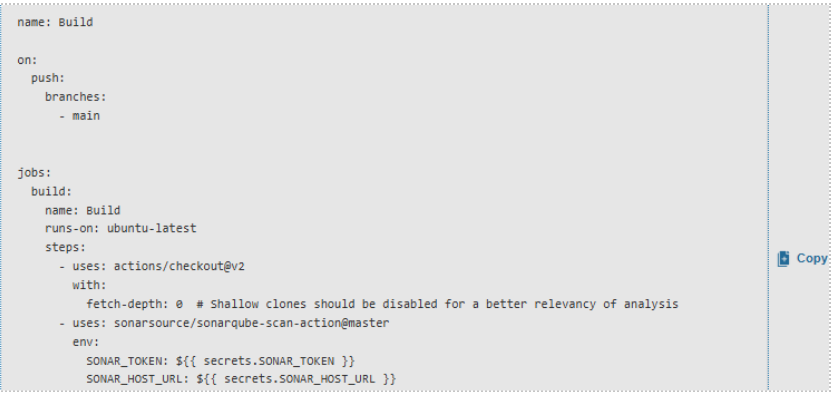
Every push to your main branch will now trigger code analysis, with results available in the SonarQube dashboard.
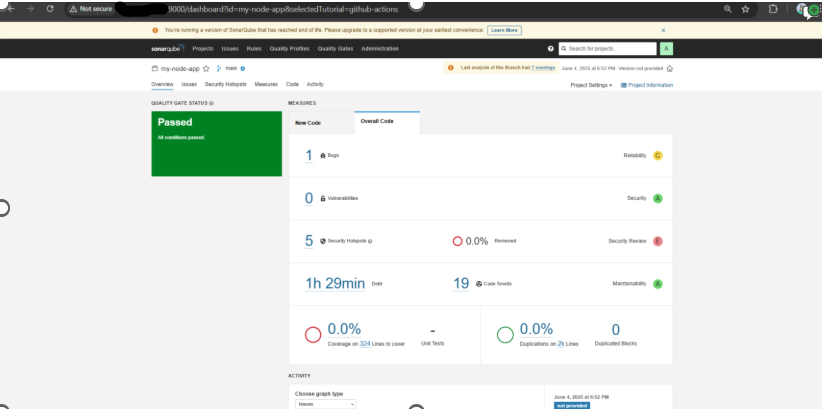
Final Thoughts:
With this setup, your teams gain immediate, actionable feedback on code quality and security, promoting cleaner code and faster delivery. This SonarQube server becomes a cornerstone of your DevOps toolchain, catalyzing better collaboration and continuous improvement.